In this document, you can find how to open a lane and what options are available on the Open Lane Window.
Choose a lane #
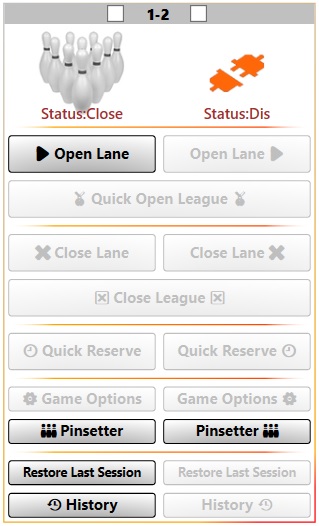
In the main window of Center Manager Software, you can see the list of all lanes. In the following picture, you can see Lane 1 and Lane 2 are in one panel. Odd lanes are always on the left side of the panel.

Click on the Open Lane button to open the Open Lane Window.
Open Lane Window #

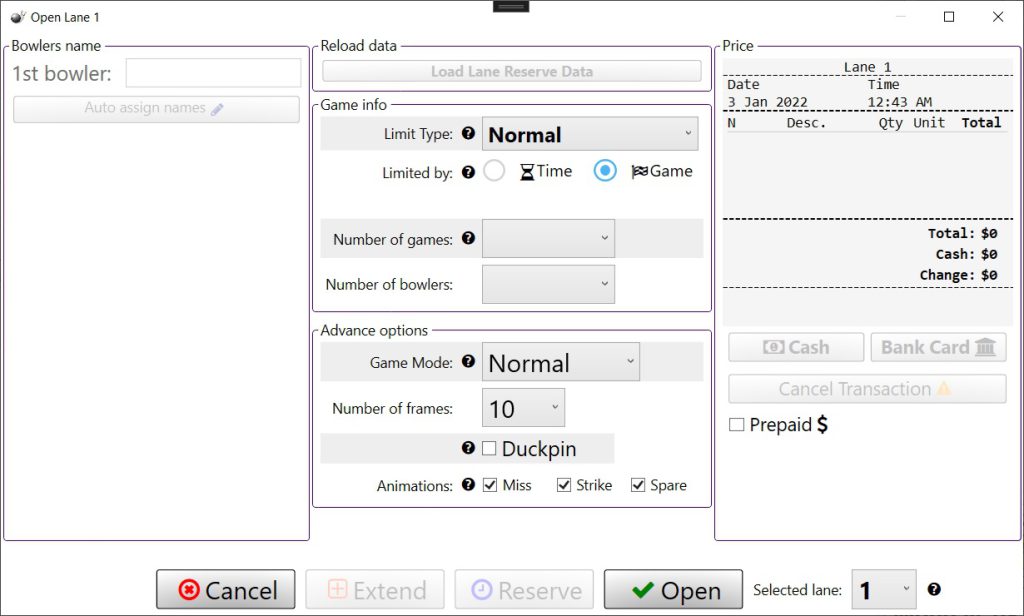
There are 5 configurable sections in the Open Lane Window. Each section will be explained below.
Game info section #
Limit type #
This option will set when this session should finish, There are two options here:
Normal #
This is the default option for opening a session. If NORMAL is selected, the scoring system will finish the session once a pre-set time has expired, or the number of pre-set games is completed. The person opening the lane will set the Time or Game limit of when a session should end.
Until end of the game #
This option is available to use when a session is playing and you want to let bowlers finish their current game, regardless of how much time, or how many frames remain.
Limit By #
A session can be limited by the number of games, or time, that bowlers are allowed/paid to play. There are two available options, Time or Game. Once you choose one of these options, selection boxes below the setting will change to reflect the appropriate value. For example, if Time was selected, the selection boxes will present all values related to configuring the lane for a Time session.
Limit Value #
If Limit By is set to Game #
The number of games each bowler can bowl is set by clicking on the Number of games drop down window. When the window opens, simply click on the number of games desired for each player to play.
Be aware that the total number of frames in the session will be: Number of bowlers x Number of games x Number of frames. For example, if the Number of games is set to 3 and there are 2 bowlers and it is a standard 10 frame games, the number of total frames for the session will be 3x2x10 = 60 frames. This information is shown in the status window under the CREDITS column.
If Limit By is set to Time #
There are two options to set the end time of the session. The first option is to use a timetable which allows you to set the session end time in half hour increments. The second option is to manually enter how much time the session should last.
30 Minutes Time Table Checkbox #
If Time was selected as the type of session that is to be opened, a drop-down window will be available. This window will show all times, in half hour increments, that are available for selection. The time options available are referred to as Off Time.
Minutes #
If the 30 Minutes Time Table is not enabled, an entry box will be visible. The amount of time the session should last, can be set directly by typing the number of minutes into the entry box.
Number of bowlers #
The number of bowlers playing in the session is entered by clicking on the Number of bowlers drop down window. Simply click on the number representing the number of bowlers that will be bowling during the session.
Advance Option #
Game Mode #
Normal #
This is the default selection. It is normal 10 pin scoring.
9 Pin No-Tap #
If 9 Pin No-Tap mode is selected, if bowlers knock down 9 pins on their first ball, this will count as a strike.
8 Pin No-Tap #
If 8 Pin No-Tap mode is selected, if bowlers knock down 8 pins on their first ball, this will count as a strike.
Number of frames #
This drop-down window allows for the number of frames per game to be set. The default is 10 frames but there are also options for 3, 5 and 7 frame games available.
Duckpin #
Duckpin scoring is similar to ten-pin scoring but bowlers have three balls per frame, instead of two.
Animations #
There are 3 checkboxes that allow the manager to set which animations are played during a session/game.
Price #
In this section, an overview of the price window is shown. The prices displayed are based on how many games, or how long a time session will last and the prices set by the manager in the settings menu. You can go to Settings -> Prices to set the base price per game or per minute.
Bowlers Name #
Last but not least, the name of players can be entered here. There are two ways to enter names. The first method is to simply type in a bowler’s name by clicking on the name box to activate it.
The second method of name entry is to Auto assign names. To auto assign names, click on the appropriate button. Based on how the manager has set the defaults in the manager area of the desk software, either numbers or letters will be displayed in the name boxes.
Open Lane Button #
Once all of the above information has been entered, click on the Open button to open the lane and start the session.


